使用F4PGA点亮Zynq xc7z010矿板(EBAZ4205)LED

内容:折腾EBAZ4205,用F4PGA综合,在Ubuntu 24.04安装vivado 2024.1. 用xvc-pico编程。
F4PGA的安装与使用
下面的问题我已经反馈到了F4PGA的issue中。
遇到的问题1: 找不到iobs.v
按照官方的文档,执行编译(TARGET="zybo" make -C counter_test)的时候出现错误:
3. Executing Verilog-2005 frontend: /home/hexiongjun/opt/f4pga/xc7/conda/envs/xc7/bin/../share/yosys/xilinx/cells_xtra.v
Parsing Verilog input from `/home/hexiongjun/opt/f4pga/xc7/conda/envs/xc7/bin/../share/yosys/xilinx/cells_xtra.v' to AST representation.
Generating RTLIL representation for module `\RAMB4_S1'.
Generating RTLIL representation for module `\RAMB4_S2'.
Generating RTLIL representation for module `\RAMB4_S4'.
Generating RTLIL representation for module `\RAMB4_S8'.
Generating RTLIL representation for module `\RAMB4_S16'.
Generating RTLIL representation for module `\RAMB4_S1_S1'.
Generating RTLIL representation for module `\RAMB4_S1_S2'.
Generating RTLIL representation for module `\RAMB4_S1_S4'.
Generating RTLIL representation for module `\RAMB4_S1_S8'.
Generating RTLIL representation for module `\RAMB4_S1_S16'.
...
...
Generating RTLIL representation for module `\ILKN'.
Generating RTLIL representation for module `\ILKNE4'.
Generating RTLIL representation for module `\VCU'.
Generating RTLIL representation for module `\FE'.
Successfully finished Verilog frontend.
ERROR: Can't open input file `/home/hexiongjun/opt/f4pga/xc7/share/f4pga/techmaps/xc7_vpr/techmap/iobs.v' for reading: No such file or directory
ERROR: TCL interpreter returned an error: Yosys command produced an error
Traceback (most recent call last):
  File "/home/hexiongjun/opt/f4pga/xc7/conda/envs/xc7/bin/symbiflow_synth", line 8, in <module>
    sys.exit(synth())
  File "/home/hexiongjun/opt/f4pga/xc7/conda/envs/xc7/lib/python3.7/site-packages/f4pga/wrappers/sh/__init__.py", line 571, in synth
    p_run_sh_script(ROOT / SH_SUBDIR / "synth.f4pga.sh", env=env)
  File "/home/hexiongjun/opt/f4pga/xc7/conda/envs/xc7/lib/python3.7/site-packages/f4pga/wrappers/sh/__init__.py", line 51, in p_run_sh_script
    check_call([str(script)] + sys_argv[1:], env=env)
  File "/home/hexiongjun/opt/f4pga/xc7/conda/envs/xc7/lib/python3.7/subprocess.py", line 363, in check_call
    raise CalledProcessError(retcode, cmd)
subprocess.CalledProcessError: Command '['/home/hexiongjun/opt/f4pga/xc7/conda/envs/xc7/lib/python3.7/site-packages/f4pga/wrappers/sh/xc7/synth.f4pga.sh', '-t', 'top', '-v', '/home/hexiongjun/github/f4pga-examples/xc7/counter_test/counter_zynq.v', '-d', 'zynq7', '-p', 'xc7z010clg400-1', '-x', '/home/hexiongjun/github/f4pga-examples/xc7/counter_test/zybo.xdc']' returned non-zero exit status 1.
make: *** [/home/hexiongjun/github/f4pga-examples/xc7/counter_test/../../common/common.mk:67: /home/hexiongjun/github/f4pga-examples/xc7/counter_test/build/zybo/top.eblif] Error 1
make: Leaving directory '/home/hexiongjun/github/f4pga-examples/xc7/counter_test'
发现确实没有提示的文件位于~/opt/f4pga/xc7/share/f4pga/techmaps/xc7_vpr/techmap/iobs.v, 但是在另一个位置中发现存在需要的文件:
~/opt/f4pga/xc7/install/share/symbiflow/techmaps/xc7_vpr/techmap/iobs.v
看了下同级目录还有其他文件,因此创建了软连接:
mkdir ~/opt/f4pga/xc7/share
mkdir ~/opt/f4pga/xc7/share/f4pga
ln -s ~/opt/f4pga/xc7/install/share/symbiflow/techmaps ~/opt/f4pga/xc7/share/f4pga/techmaps
重新编译,发现又遇到了类似的问题:
54. Executing BLIF backend.

Warnings: 67 unique messages, 68 total
End of script. Logfile hash: 58d5cd1695, CPU: user 10.20s system 0.16s, MEM: 342.66 MB peak
Yosys 0.27+22 (git sha1 0f5e7c244, x86_64-conda-linux-gnu-cc 11.2.0 -fvisibility-inlines-hidden -fmessage-length=0 -march=nocona -mtune=haswell -ftree-vectorize -fPIC -fst
ack-protector-strong -fno-plt -O2 -ffunction-sections -fdebug-prefix-map=/root/conda-eda/conda-eda/workdir/conda-env/conda-bld/yosys_1680770278298/work=/usr/local/src/cond
a/yosys-0.27_29_g0f5e7c244 -fdebug-prefix-map=/home/hexiongjun/opt/f4pga/xc7/conda/envs/xc7=/usr/local/src/conda-prefix -fPIC -Os -fno-merge-constants)
Time spent: 45% 45x read_verilog (5 sec), 20% 1x tcl (2 sec), ...
cd /home/hexiongjun/github/f4pga-examples/xc7/counter_test/build/zybo && symbiflow_pack -e top.eblif -d xc7z010_test  2>&1 > /dev/null
Error 1: /home/hexiongjun/opt/f4pga/xc7/share/f4pga/arch/xc7z010_test/arch.timing.xml:-1 Failed to open file
Traceback (most recent call last):
  File "/home/hexiongjun/opt/f4pga/xc7/conda/envs/xc7/bin/symbiflow_pack", line 8, in <module>
    sys.exit(pack())
  File "/home/hexiongjun/opt/f4pga/xc7/conda/envs/xc7/lib/python3.7/site-packages/f4pga/wrappers/sh/__init__.py", line 502, in pack
    p_vpr_run(["--pack"] + extra_args, env=p_vpr_env_from_args("pack"))
  File "/home/hexiongjun/opt/f4pga/xc7/conda/envs/xc7/lib/python3.7/site-packages/f4pga/wrappers/sh/__init__.py", line 135, in p_vpr_run
    + args,
  File "/home/hexiongjun/opt/f4pga/xc7/conda/envs/xc7/lib/python3.7/subprocess.py", line 363, in check_call
    raise CalledProcessError(retcode, cmd)
subprocess.CalledProcessError: Command '['/home/hexiongjun/opt/f4pga/xc7/conda/envs/xc7/bin/vpr', '/home/hexiongjun/opt/f4pga/xc7/share/f4pga/arch/xc7z010_test/arch.timing.xml', 'top.eblif', '--max_router_iterations', '500', '--routing_failure_predictor', 'off', '--router_high_fanout_threshold', '-1', '--constant_net_method', 'route', '--route_chan_width', '500', '--router_heap', 'bucket', '--clock_modeling', 'route', '--place_delta_delay_matrix_calculation_method', 'dijkstra', '--place_delay_model', 'delta', '--router_lookahead', 'extended_map', '--check_route', 'quick', '--strict_checks', 'off', '--allow_dangling_combinational_nodes', 'on', '--disable_errors', 'check_unbuffered_edges:check_route', '--congested_routing_iteration_threshold', '0.8', '--incremental_reroute_delay_ripup', 'off', '--base_cost_type', 'delay_normalized_length_bounded', '--bb_factor', '10', '--acc_fac', '0.7', '--astar_fac', '1.8', '--initial_pres_fac', '2.828', '--pres_fac_mult', '1.2', '--check_rr_graph', 'off', '--suppress_warnings', 'noisy_warnings-xc7z010_test_pack.log,sum_pin_class:check_unbuffered_edges:load_rr_indexed_data_T_values:check_rr_node:trans_per_R:check_route:set_rr_graph_tool_comment:calculate_average_switch', '--device', 'xc7z010-test', '--read_rr_graph', '/home/hexiongjun/opt/f4pga/xc7/share/f4pga/arch/xc7z010_test/rr_graph_xc7z010_test.rr_graph.real.bin', '--read_router_lookahead', '/home/hexiongjun/opt/f4pga/xc7/share/f4pga/arch/xc7z010_test/rr_graph_xc7z010_test.lookahead.bin', '--read_placement_delay_lookup', '/home/hexiongjun/opt/f4pga/xc7/share/f4pga/arch/xc7z010_test/rr_graph_xc7z010_test.place_delay.bin', '--pack']' returned non-zero exit status 1.
make: *** [/home/hexiongjun/github/f4pga-examples/xc7/counter_test/../../common/common.mk:71: /home/hexiongjun/github/f4pga-examples/xc7/counter_test/build/zybo/top.net] Error 1
make: Leaving directory '/home/hexiongjun/github/f4pga-examples/xc7/counter_test'
然后调查发现也是路径不对的问题, 因此将其他几个目录也创建软连接, 整理如下:
cd /home/hexiongjun/opt/f4pga/xc7/share/f4pga
ln -s /home/hexiongjun/opt/f4pga/xc7/install/share/symbiflow/arch arch
ln -s /home/hexiongjun/opt/f4pga/xc7/install/share/symbiflow/scripts scripts
ln -s /home/hexiongjun/opt/f4pga/xc7/install/share/symbiflow/techmaps techmaps
继续就可以编译通过了:
...
...
Create Device took 10.84 seconds (max_rss 2257.0 MiB, delta_rss +2173.9 MiB)

Load Placement
Reading top.place.

Successfully read top.place.

Load Placement took 0.08 seconds (max_rss 2257.0 MiB, delta_rss +0.0 MiB)

Load Routing
Begin loading FPGA routing file.
Finished loading route file
Warning 667: 1 timing startpoints were not constrained during timing analysis
Warning 668: 4 timing endpoints were not constrained during timing analysis
Load Routing took 0.12 seconds (max_rss 2257.0 MiB, delta_rss +0.0 MiB)

Checking to ensure routing is legal...
Completed routing consistency check successfully.

Serial number (magic cookie) for the routing is: 685934963
Circuit successfully routed with a channel width factor of 500.
Incr Slack updates 1 in 5.3962e-05 sec
Full Max Req/Worst Slack updates 1 in 4.742e-06 sec
Incr Max Req/Worst Slack updates 0 in 0 sec
Incr Criticality updates 0 in 0 sec
Full Criticality updates 1 in 6.3123e-05 sec
Synchronize the packed netlist to routing optimization
# Annotating rr_node with routed nets
# Annotating rr_node with routed nets took 0.00 seconds (max_rss 2257.0 MiB, delta_rss +0.0 MiB)
Found 0 mismatches between routing and packing results.
Fixed 0 routing traces due to mismatch between routing and packing results.
Synchronize the packed netlist to routing optimization took 0.01 seconds (max_rss 2257.0 MiB, delta_rss +0.0 MiB)
Writing Implementation FASM: top.fasm
The entire flow of VPR took 16.5952 seconds.
writing final fasm (extra: top_fasm_extra.fasm)
cd /home/hexiongjun/github/f4pga-examples/xc7/counter_test/build/zybo && symbiflow_write_bitstream -d zynq7 -f top.fasm -p xc7z010clg400-1 -b top.bit
[F4PGA] Running (deprecated) write bitstream
Writing bitstream ...
make: Leaving directory '/home/hexiongjun/github/f4pga-examples/xc7/counter_test'
整个编译(综合,布线)过程大概耗费了10分钟,发现布线是单进程:

Htop
修改代码
查看common/common.mk 可以知道目标zybo用的是zynq xc7z010,和我们用的矿板一样:
else ifeq ($(TARGET),zybo)
  DEVICE := xc7z010_test
  BITSTREAM_DEVICE := zynq7
  PARTNAME := xc7z010clg400-1
  OFL_BOARD := zybo_z7_10
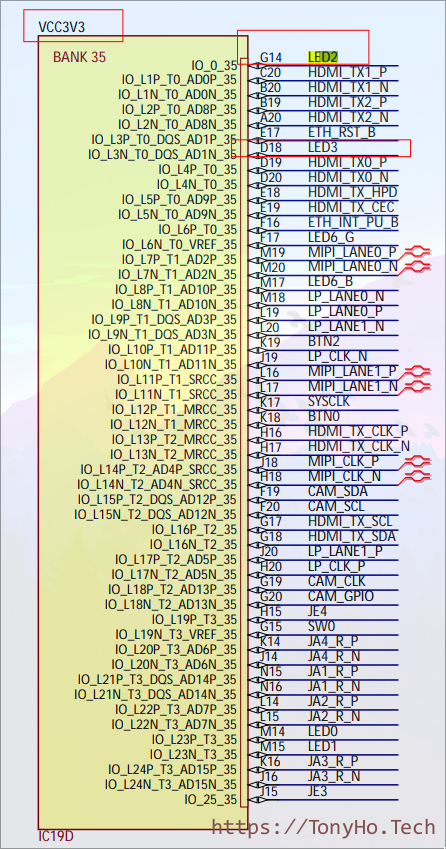
对比硬件原理图,确认LED是否一致.
查看约束文件:
$ cat counter_test/zybo.xdc
# Clock pin
set_property LOC K17 [get_ports {clk}]
set_property IOSTANDARD LVCMOS33 [get_ports {clk}]

# LEDs
set_property LOC M14 [get_ports {led[0]}]
set_property LOC M15 [get_ports {led[1]}]
set_property LOC G14 [get_ports {led[2]}]
set_property LOC D18 [get_ports {led[3]}]
set_property IOSTANDARD LVCMOS33 [get_ports {led[0]}]
set_property IOSTANDARD LVCMOS33 [get_ports {led[1]}]
set_property IOSTANDARD LVCMOS33 [get_ports {led[2]}]
set_property IOSTANDARD LVCMOS33 [get_ports {led[3]}]

# Clock constraints
create_clock -period 8.0 [get_ports {clk}]
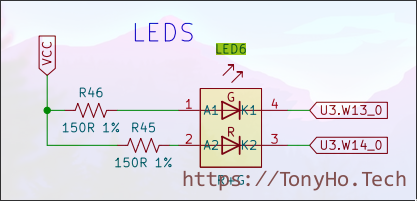
对比zybo的原理图, 其是匹配的:
zybo LED sch
也可以查看zybo官方的约束文件:
##LEDs
#set_property -dict { PACKAGE_PIN M14   IOSTANDARD LVCMOS33 } [get_ports { led[0] }]; #IO_L23P_T3_35 Sch=led[0]
#set_property -dict { PACKAGE_PIN M15   IOSTANDARD LVCMOS33 } [get_ports { led[1] }]; #IO_L23N_T3_35 Sch=led[1]
#set_property -dict { PACKAGE_PIN G14   IOSTANDARD LVCMOS33 } [get_ports { led[2] }]; #IO_0_35 Sch=led[2]
#set_property -dict { PACKAGE_PIN D18   IOSTANDARD LVCMOS33 } [get_ports { led[3] }]; #IO_L3N_T0_DQS_AD1N_35 Sch=led[3]
而矿板:

EBit VCCE

EBit VCC

EBit VCC
EBit VCC
EBit VCC
EBit VCC
因此可以看到使用的是:
LED1: W13
LED2: W14
修改约束文件。
矿板设置
清理干净矿板的灰尘后,接上USB2TTL, 打开串口工具,上电,按下d, 终止Uboot的bootm, 然后根据这里面的说明配置密码和网络。
烧录比特流
尝试使用PS端linux来烧录
scp [email protected]:~/github/f4pga-examples/xc7/counter_test/build/zybo/top.bit /

root@zedboard-zynq7:~# cat /top.bit > /dev/xdevcfg
Error while parsing bitstream header
Could not read the version from the bitstream
Error while parsing bitstream header
Could not read the version from the bitstream
cat: write error: Bad address
root@zedboard-zynq7:~# macb e000b000.ethernet eth0: link down

root@zedboard-zynq7:~#
烧录失败,提示bitstream中没有版本号。
尝试使用Pico(RP2040)制作FPGA Jtag来烧录
根据xvc pico的说明,编译出对应固件的Daemon,Pico按住Boot启动,然后会生产Mass Storage设备,然后将xvcPico.uv2 拖入到对应的Storage, 烧录完成后自动重启。
连线参考xvc-pico的ReadMe的图片,以及在子目录中的图片
尝试使用openFPGAloader来加载,使用的是bin来自于xvc-pico项目里面的测试bin:
正常的话可以看到对应的信息:
$ sudo dmesg
[712045.707208] usb 1-2.1: USB disconnect, device number 30
[712048.557697] usb 1-2.1: new full-speed USB device number 31 using xhci_hcd
[712048.660009] usb 1-2.1: New USB device found, idVendor=2e8a, idProduct=000a, bcdDevice= 1.10
[712048.660014] usb 1-2.1: New USB device strings: Mfr=1, Product=2, SerialNumber=3
[712048.660016] usb 1-2.1: Product: Pico
[712048.660017] usb 1-2.1: Manufacturer: Raspberry Pi
[712048.660018] usb 1-2.1: SerialNumber: 454B42313130000C
[712048.678854] cdc_acm 1-2.1:1.0: ttyACM0: USB ACM device
执行Daemon:
$ sudo xvcd-pico
NB: ep_size => 64
XVCPI is listening now with BUFFER_SIZE => 10240!
可以使用其串口,也可以使用Jtag. 尝试使用openFPGAloader来加载,使用的是bin来自于xvc-pico项目里面的测试bin:
$ openFPGALoader -c xvc-client --port 2542 --file-type bin blink.bin
empty
detected xvcServer version v1.0 packet size 10240
freq 6000000 166.666667 166 0
a6 0 0 0
Open file DONE
Parse file DONE
load program
Load SRAM: [==================================================] 100.00%
Done
加载完成后,可以发现两个LED在闪亮. 烧录完成的时候LED1会亮起来,而在烧录的时候会熄灭。
测试好了烧录工具后,测试我们的代码。
openFPGALoader -c xvc-client --port 2542 --file-type bit ~/github/f4pga-examples/xc7/counter_test/build/zybo/top.bit
empty
detected xvcServer version v1.0 packet size 10240
freq 6000000 166.666667 166 0
a6 0 0 0
Open file DONE
Parse file DONE
load program
Load SRAM: [==================================================] 100.00%
Done
发现烧录后PS也死掉了,console完全没有任何反应,最末尾的打印为:
root@zedboard-zynq7:~# macb e000b000.ethernet eth0: link down
编写LED闪烁代码
看起来是修改的代码有问题,折腾了好一会,最终搞定了的的闪烁,按如下修改。
修改xds约束文件counter_test/zybo.xdc:
# Clock pin

set_property LOC N18 [get_ports {clk}]
set_property IOSTANDARD LVCMOS33 [get_ports {clk}]

# LEDs

set_property IOSTANDARD LVCMOS33 [get_ports {led_out[1]}]
set_property IOSTANDARD LVCMOS33 [get_ports {led_out[0]}]

# LEDs

set_property LOC W13 [get_ports {led_out[1]}]
set_property LOC W14 [get_ports {led_out[0]}]

# Clock constraints

create_clock -period 8.0 [get_ports {clk}]
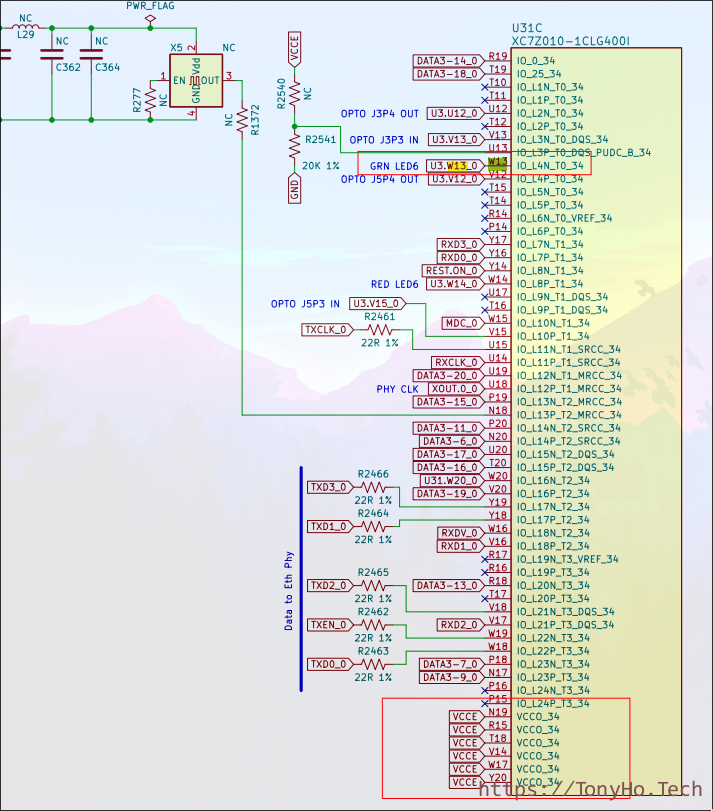
这里面需要设定clk, 从原理图可以看到:
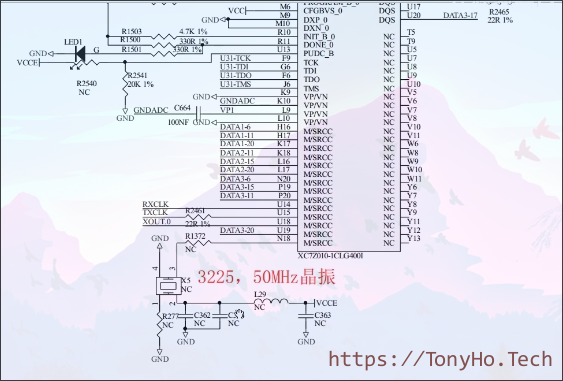
CLK in schematic
修改代码文件counter_test/counter_zynq.v,改成下面的内容,用于交替闪烁LED6上面的两个红绿LED.
这个代码基本上来源于这个仓库的Demo代码。
module top(
     input clk,
     input rst_n,
     input [1:0] led_in,
     output [1:0] led_out
    );

 parameter T1MS = 26'd50_000_000 ; //50MHz
 reg [25:0]time_count;//timer counter
 reg led_g;
 always@(posedge clk or negedge rst_n)
     if(!rst_n)begin
        time_count<=26'd0;
        led_g<=1'b0;
     end
     else begin
         if(time_count>=T1MS)begin
             time_count<=26'd0;
             led_g<=~led_g;
         end
         else time_count<=time_count+1'b1;
     end
 assign led_out[0]=(~led_g)&led_in[0]; // Red
 assign led_out[1]=led_g&led_in[1]; //Green
// initial state - red lights with 0 and green blink enabled with 1
// AXI default output value should be 0x00000002
endmodule
再次编译,最终得到bit文件,烧录测试即可。
其他问题
在Ubuntu 24.04中安装Vivado 2024.1的问题
最终会卡在generate device list中:
这个是因为缺少库,参考这个博客,解决的方式为:
killall vivado
然后安装持续会提示出错,点击OK即可。
安装对应的缺失文件:
sudo apt install libtinfo-dev
sudo ln -s /lib/x86_64-linux-gnu/libtinfo.so.6 /lib/x86_64-linux-gnu/libtinfo.so.5

sudo apt install libncurses5-dev
手动执行install_driver(假设安装到了/Xilinx/), 这个和前面的博客提到的地址不一样:
cd /Xilinx/Vivado/2024.1/data/xicom/cable_drivers/lin64/install_script/install_drivers
sudo ./install_drivers
上面只是安装了driver, 下面是上面博客不存在的步骤,用于生成device list:
cd /Xilinx/Vivado/2024.1/bin
./vivado  -nolog -nojournal -mode batch -source

 /Xilinx/Vivado/2024.1/bin/vivado -nolog -nojournal -mode batch -source /Xilinx/Vivado/2024.1/scripts/sysgen/tcl/xlpartinfo.tcl -tclargs /Xilinx/Vivado/2024.1/data/parts/installed_devices.txt
这个执行的方法是是来源于安装包卡住的时候ps看到的进程:
$ ps aux | grep vivado
hexiong+ 2728937  0.0  0.0   2808  1664 pts/27   S+   09:58   0:00 /bin/sh -c /Xilinx/Vivado/2024.1/bin/vivado -nolog -nojournal -mode batch -source /Xilinx/Vivado/2024.1/scripts/sysgen/tcl/xlpartinfo.tcl -tclargs /Xilinx/Vivado/2024.1/data/parts/installed_devices.txt
hexiong+ 2728940  0.0  0.0  13172  3584 pts/27   S+   09:58   0:00 /bin/bash /Xilinx/Vivado/2024.1/bin/vivado -nolog -nojournal -mode batch -source /Xilinx/Vivado/2024.1/scripts/sysgen/tcl/xlpartinfo.tcl -tclargs /Xilinx/Vivado/2024.1/data/parts/installed_devices.txt
hexiong+ 2728970  0.0  0.0  13172  3584 pts/27   S+   09:58   0:00 /bin/bash /Xilinx/Vivado/2024.1/bin/loader -exec vivado -nolog -nojournal -mode batch -source /Xilinx/Vivado/2024.1/scripts/sysgen/tcl/xlpartinfo.tcl -tclargs /Xilinx/Vivado/2024.1/data/parts/installed_devices.txt
hexiong+ 2729042  0.3  0.5 280652 117740 pts/27  Sl+  09:58   0:01 /Xilinx/Vivado/2024.1/bin/unwrapped/lnx64.o/vivado -nolog -nojournal -mode batch -source /Xilinx/Vivado/2024.1/scripts/sysgen/tcl/xlpartinfo.tcl -tclargs /Xilinx/Vivado/2024.1/data/parts/installed_devices.txt
hexiong+ 2839317  0.0  0.0  12244  2304 pts/7    S+   10:06   0:00 grep --color=auto vivado
然后就会生成devie list 文件: /Xilinx/Vivado/2024.1/data/parts/installed_devices.txt .
pico(RP2040)制作的xvc-pico的串口问题
表现为pico会缓存log, 转发打印的log不完整, 这个问题暂时没有去调查。
pico(RP2040)制作的xvc-pico的无法与Vivado连接, 无法远程访问
表现为,使用frp等软件进行转发TCP来远程烧写的时候无法工作。
这个需要使用到openFPGALoader的--ip 选项.
这个问题也暂时没有去调查。
Update:
后来发现是自己对Vivado不熟悉导致的,连接的时候需要选择Local Hardware server,而不是remote target server. 操作步骤如下才是对的:
先Auto连接本地
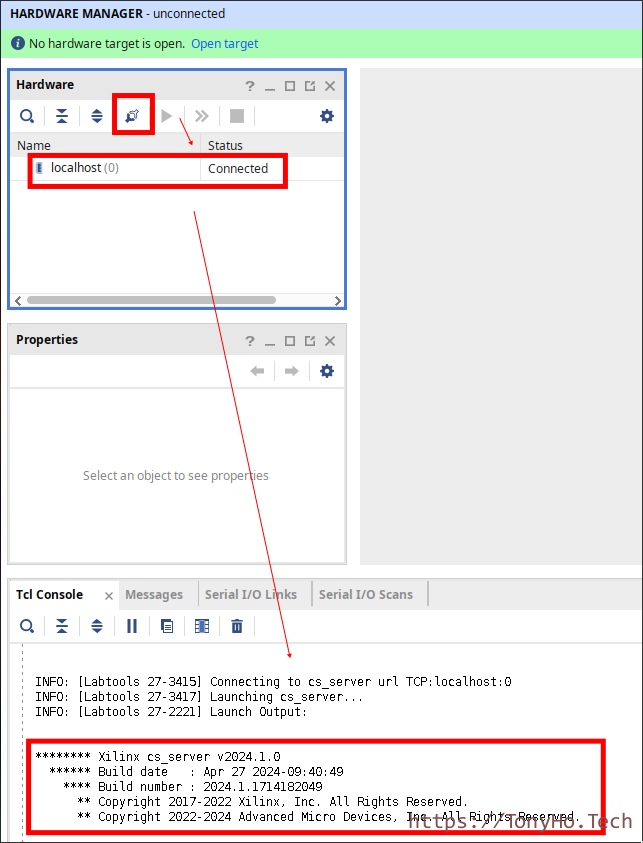
Auto Connect to Local
然后右键新建XVC:
Auto Connect to Local
输入IP和端口即可:

New XVC
连接后:
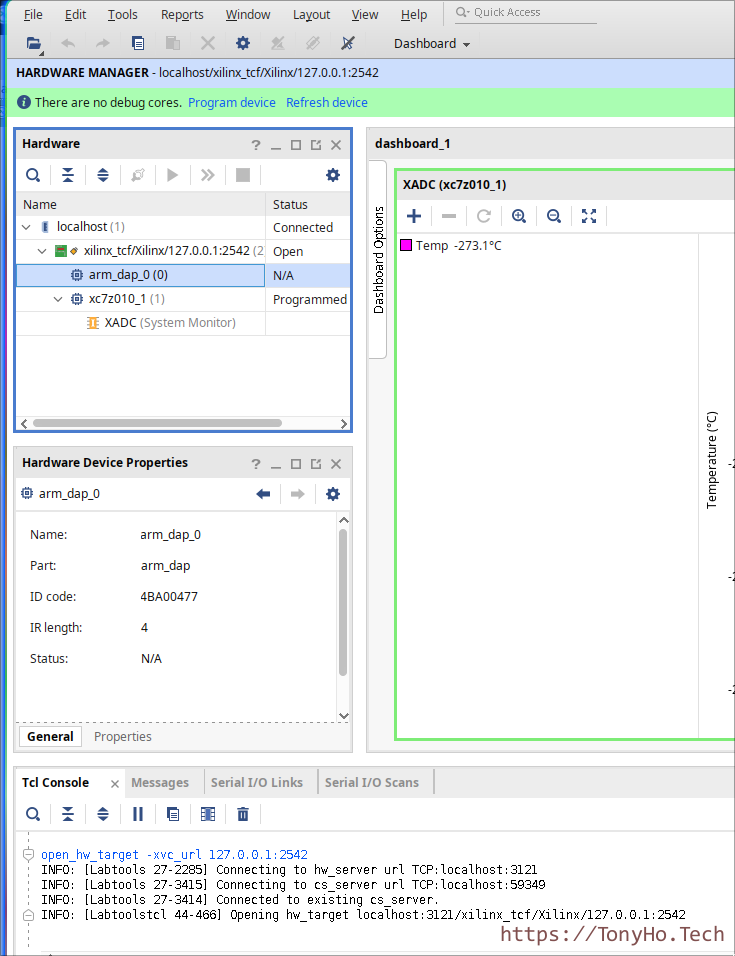
Connected
发现连接一次后,xvc-pico的daemon有的时候会出现错误,这个时候需要拔插pico usb,然后再次运行xvc-pico daemon:
gpio_xfer_full: usb bulk write failed!
gpio_xfer_full: usb bulk read failed!
[Total Bytes] 32, [Return Code] -4 [Actual Length] 32323
gpio_xfer_full: usb bulk write failed!
gpio_xfer_full: usb bulk read failed!
[Total Bytes] 32, [Return Code] -4 [Actual Length] 32323
gpio_xfer_full: usb bulk read failed!
[Total Bytes] 10, [Return Code] -4 [Actual Length] 32323
gpio_write: usb bulk write failed
错误的步骤是,直接使用绿色栏中的Open Target –> Open new Target –> New XVC:
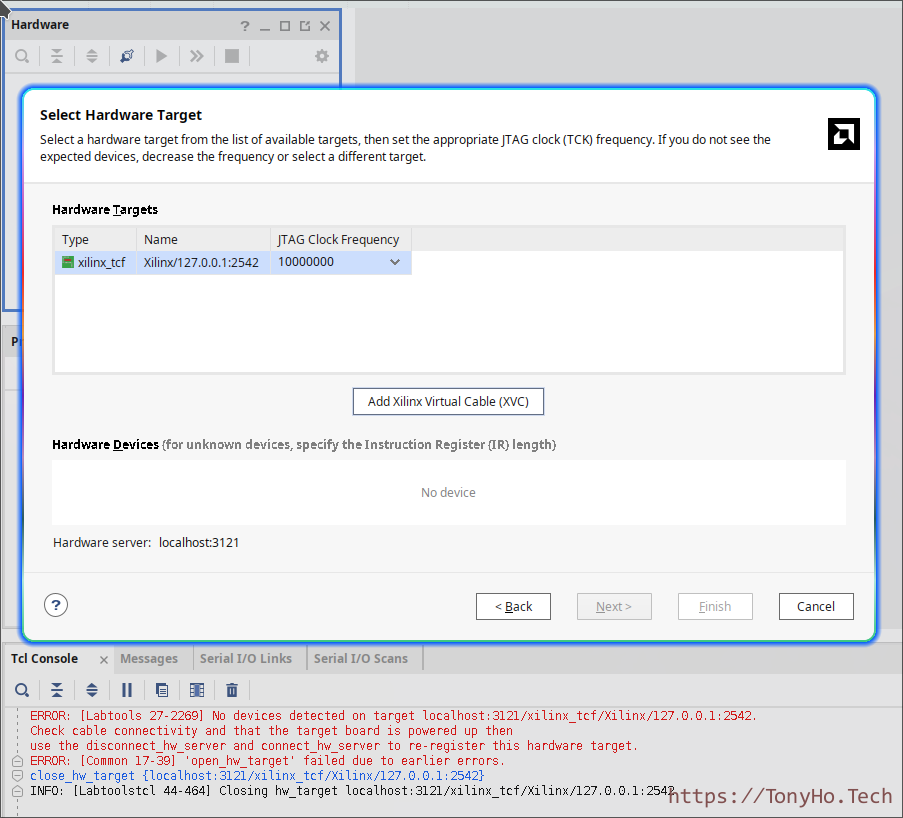
New XVC in new target
这个时候会无法找到zynq硬件。
pico(RP2040)制作的xvc-pico的与Zynq的两个共地
表现为,仅仅是Jtag这边GND与Zynq的Jtag的GND用导线连起来,但是UART不使用GND与Zynq的UART GND连接,那么会出现串口无法使用的问题。 猜测是共地不稳定导致的,因为Pico的两个GND是连接在一起的。
pico(RP2040)制作的xvc-pico的串口线会向Zynq灌电流
这个表现为Zynq不连接电源,PWR LED(LED4)和PL端LED1也会微亮,这个是因为Pico与Zynq的IO连线没有方向控制导致的。